简介
八大常见的数据结构
- 数组:Array
- 堆栈:Stack
- 队列:Queue
- 链表:Linked Lists
- 树:Trees
- 图:Graphs
- 字典树:Trie
- 散列表(哈希表):Hash Tables
上面的结构,在较高的层次上,可合为三种类型:
- 堆栈和队列是类似于数组的结构,仅在项目的插入和删除方式上有所不同。
- 链表,树,和图 结构的节点是引用到其他节点。
- 散列表依赖于散列函数来保存和定位数据。
在复杂性方面:
- 堆栈和队列是最简单的,并且可以从中构建链表。
- 树和图 是最复杂的,因为它们扩展了链表的概念。
- 散列表和字典树 需要利用这些数据结构来可靠地执行。
在效率方面:
- 链表是记录和存储数据的最佳选择
- 而哈希表和字典树 在搜索和检索数据方面效果最佳。
数组:Array
数组是最简单的数据结构。 贴一张每个函数都运行10,000次迭代:
10,000个随机密钥在10,000个对象的数组中查找的执行效率对比图:
[
  {
    id: "key0",
    content: "I ate pizza 0 times"
  },
  {
    id: "key1",
    content: "I ate pizza 1 times"
  },
  {
    id: "key2",
    content: "I ate pizza 2 times"
  },
  ...
]

["key284", "key958", "key23", "key625", "key83", "key9", ... ]
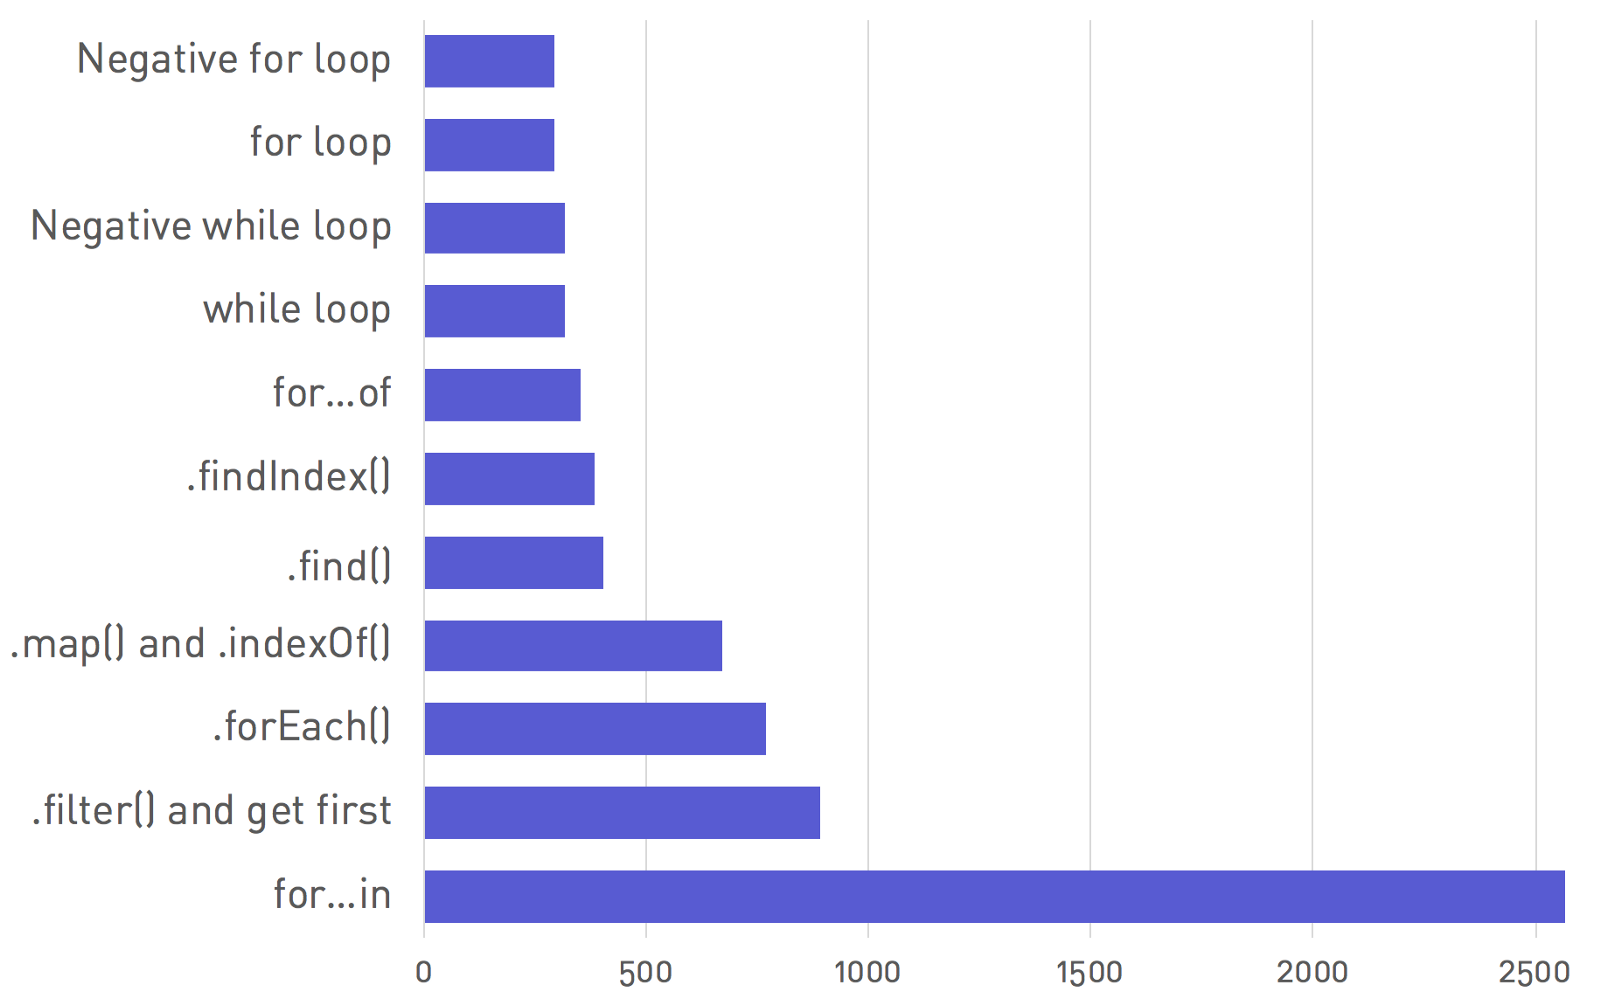
for… in为何这么慢?
for… in语法令人难以置信的缓慢。在测试中就已经比正常情况下慢近9倍的循环。
这是因为for … in语法是第一个能够迭代对象键的JavaScript语句。
循环对象键({})与在数组([])上进行循环不同,
因为引擎会执行一些额外的工作来跟踪已经迭代的属性。
堆栈:Stack

堆栈是元素的集合,可以在顶部添加项目,我们有几个实际的堆栈示例:
浏览器历史记录 撤消操作 递归以及其它。
两句话解释堆栈:
- 两个原则操作:push和pop。Push 将元素添加到数组的顶部,而Pop将它们从同一位置删除。
- 遵循”Last In,First Out”,即:LIFO,后进先出。
堆栈的实现。
请注意,下方例子中,我们可以颠倒堆栈的顺序:底部变为顶部,顶部变为底部。
因此,我们可以分别使用数组unshift和shift方法代替push和pop。
class Stack {
    constructor(...items) {
        this.reverse = false;
        this.stack = [...items];
    }

    push(...items) {
        return this.reverse
            ? this.stack.unshift(...items)
            : this.stack.push(...items);
    }

    pop() {
        return this.reverse ? this.stack.shift() : this.stack.pop();
    }
}

const stack = new Stack(4, 5);
stack.reverse = true;
console.log(stack.push(1, 2, 3) === 5) // true
console.log(stack.stack === [1, 2, 3, 4, 5]) // true
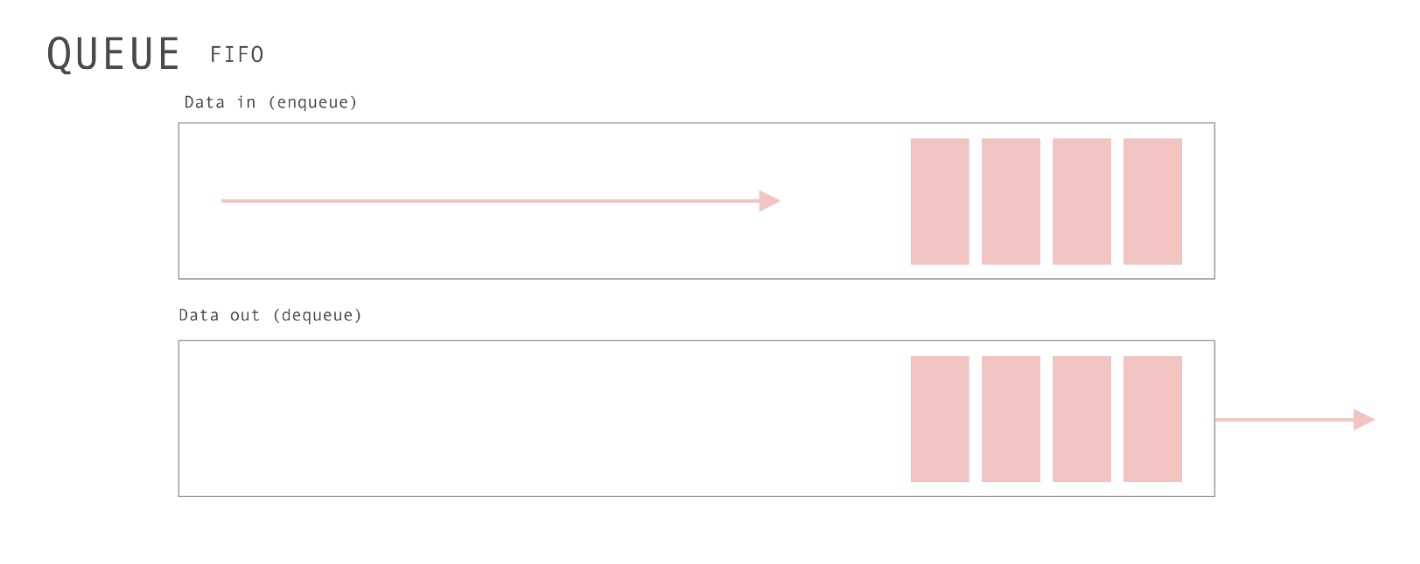
队列:Queue
在计算机科学中,一个队列(queue)是一种特殊类型的抽象数据类型或集合。集合中的实体按顺序保存。
在前端开发中,最著名的队列使用当属浏览器/NodeJs中 关于宏任务与微任务。
在后端领域,用得最广泛的就是消息队列:Message queue:如RabbitMQ、ActiveMQ等。
以编程思想而言,Queue可以用两句话描述:
- 只是具有两个主要操作的数组:unshift和pop。
- 遵循”Fist In,first out”即:FIFO,先进先出。
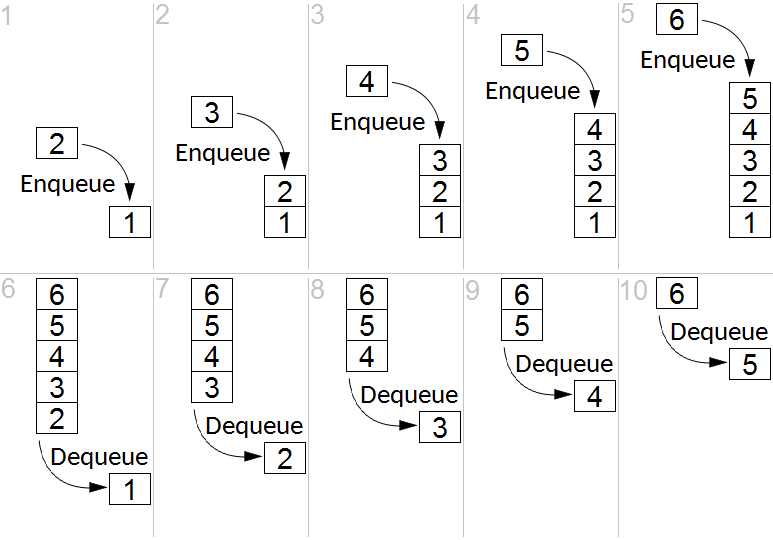
队列的实现
请注意,下方例子中,我们可以颠倒堆队列的顺序。
因此,我们可以分别使用数组unshift和shift方法代替push和pop。
class Queue {
    constructor(...items) {
        this.reverse = false;
        this.queue = [...items];
    }

    enqueue(...items) {
        return this.reverse
            ? this.queue.push(...items)
            : this.queue.unshift(...items);
    }

    dequeue() {
        return this.reverse ? this.queue.shift() : this.queue.pop();
    }
}
链表:Linked Lists
与数组一样,链表是按顺序存储数据元素。
链表不是保留索引,而是指向其他元素。
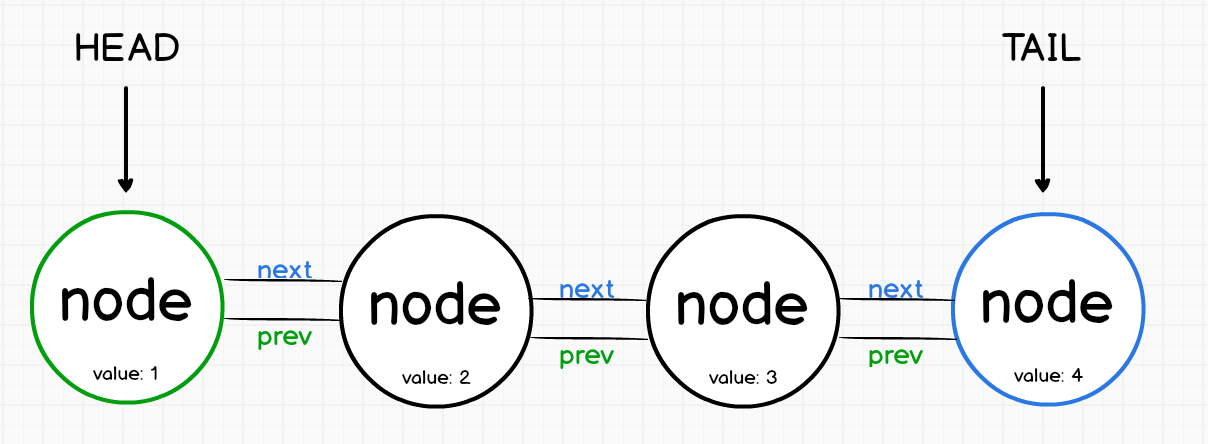
第一个节点称为头部(head),而最后一个节点称为尾部(tail)。
单链表与双向链表:
- 单链表是表示一系列节点的数据结构,其中每个节点指向列表中的下一个节点。
- 链表通常需要遍历整个操作列表,因此性能较差。
- 提高链表性能的一种方法是在每个节点上添加指向列表中上一个节点的第二个指针。
- 双向链表具有指向其前后元素的节点。
链表的优点:
- 链接具有常量时间 插入和删除,因为我们可以只更改指针。
- 与数组一样,链表可以作为堆栈运行。
链表的应用场景:
- 在客户端上,像Redux就以链表方式构建其中的逻辑。
- React 核心算法 React Fiber的实现就是链表。
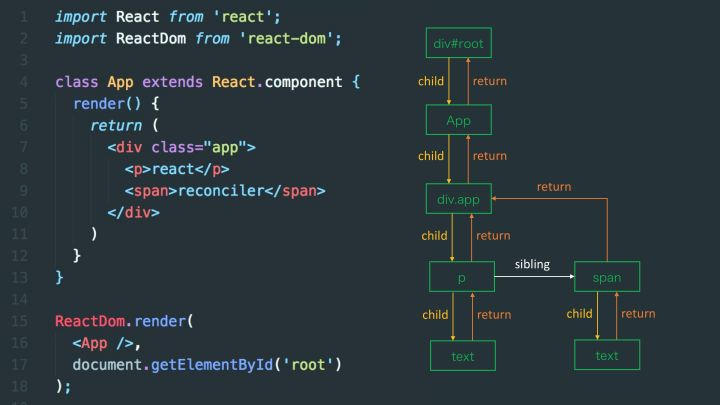
- React Fiber之前的Stack Reconciler,是自顶向下的递归mount/update,无法中断(持续占用主线程),这样主线程上的布局、动画等周期性任务以及交互响应就无法立即得到处理,影响体验。
- React Fiber解决过去Reconciler存在的问题的思路是把渲染/更新过程(递归diff)拆分成一系列小任务,每次检查树上的一小部分,做完看是否还有时间继续下一个任务,有的话继续,没有的话把自己挂起,主线程不忙的时候再继续。
- 在服务器上,像Express这样的Web框架也以类似的方式构建其中间件逻辑。当请求被接收时,它从一个中间件管道输送到下一个,直到响应被发出。
单链表实现
单链表的操作核心有:
- push(value) - 在链表的末尾/头部添加一个节点
- pop() - 从链表的末尾/头部删除一个节点
- get(index) - 返回指定索引处的节点
- delete(index) - 删除指定索引处的节点
- isEmpty() - 根据列表长度返回true或false
- print() - 返回链表的可见表示
class Node {
constructor(data) {
this.data = data
this.next = null
}
}
class LinkedList {
constructor() {
this.head = null
this.tail = null
// 长度非必要
this.length = 0
}
push(data) {
// 创建一个新节点
const node = new Node(data)
// 检查头部是否为空
if (this.head === null) {
this.head = node
this.tail = node
}
this.tail.next = node
this.tail = node
this.length++
}
pop(){
// 先检查链表是否为空
if(this.isEmpty()) {
return null
}
// 如果长度为1
if (this.head === this.tail) {
this.head = null
this.tail = null
this.length--
return this.tail
}
let node = this.tail
let currentNode = this.head
let penultimate
while (currentNode) {
if (currentNode.next === this.tail) {
penultimate = currentNode
break
}
currentNode = currentNode.next
}
penultimate.next = null
this.tail = penultimate
this.length --
return node
}
get(index){
// 处理边界条件
if (index === 0) {
return this.head
}
if (index < 0 || index > this.length) {
return null
}
let currentNode = this.head
let i = 0
while(i < index) {
i++
currentNode = currentNode.next
}
return currentNode
}
delete(index){
let currentNode = this.head
if (index === 0) {
let deletedNode
currentNode.next = this.head
deletedNode = currentNode
this.length--
return deletedNode
}
if (index < 0 || index > this.length) {
return null
}
let i = 0
let previous
while(i < index) {
i++
previous = currentNode
currentNode = currentNode.next
}
previous.next = currentNode.next
this.length--
return currentNode
}
isEmpty() {
return this.length === 0
}
print() {
const list = []
let currentNode = this.head
while(currentNode){
list.push(currentNode.data)
currentNode = currentNode.next
}
return list.join(' => ')
}
}
// 测试一下
const l = new LinkedList()
// 添加节点
const values = ['A', 'B', 'C']
values.forEach(value => l.push(value))
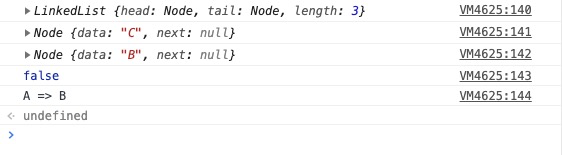
console.log(l)
console.log(l.pop())
console.log(l.get(1))
console.log(l.isEmpty())
console.log(l.print())
结果:
双向链表实现
双向链表的设计
类似于单链表,双向链表由一系列节点组成。每个节点包含一些数据以及指向列表中下一个节点的指针和指向前一个节点的指针。这是JavaScript中的简单表示:
一个简单的双向链表

class Node {
    constructor(data) {
        // data 包含链表项应存储的值
        this.data = data;
        // next 是指向列表中下一项的指针
        this.next = null;
        // prev 是指向列表中上一项的指针
        this.prev = null;
    }
}

class DoublyLinkedList {
    constructor() {
        this.head = null;
        this.tail = null;
    }
    // 各种操作方法
    // 在链表的尾部添加节点
    append( item ) {
        let node = new Node( item );
        if(!this.head) {
            this.head = node;
            this.tail = node;
        } else {
            node.prev = this.tail;
            this.tail.next = node;
            this.tail = node
        }
    }

    // 在链表的指定位置添加节点
    appendAt( pos, item ) {
        let current = this.head;
        let counter = 1;
        let node = new Node( item );
        if( pos == 0 ) {
            this.head.prev = node
            node.next = this.head
            this.head = node
        } else {
            while(current) {
            current = current.next;
            if( counter == pos ) {
                node.prev = current.prev
                current.prev.next = node
                node.next = current
                current.prev = node
            }
            counter++
            }
        }
    }

    // 在链表的尾部删除节点
    remove( item ) {
        let current = this.head;
        while( current ) {
            if( current.data === item ) {
            if( current == this.head && current == this.tail ) {
                this.head = null;
                this.tail = null;
            } else if ( current == this.head ) {
                this.head = this.head.next
                this.head.prev = null
            } else if ( current == this.tail ) {
                this.tail = this.tail.prev;
                this.tail.next = null;
            } else {
                current.prev.next = current.next;
                current.next.prev = current.prev;
            }
        }
        current = current.next
        }
    }

    // 在链表的指定位置删除节点
    removeAt( pos ) {
        let current = this.head;
        let counter = 1;
        if( pos == 0 ) {
            this.head = this.head.next;
            this.head.prev = null;
        } else {
            while( current ) {
                current = current.next
                if ( current == this.tail ) {
                    this.tail = this.tail.prev;
                    this.tail.next = null;
                } else if( counter == pos ) {
                    current.prev.next = current.next;
                    current.next.prev = current.prev;
                    break;
                }
                counter++;
            }
        }
    }

    // 翻转双向链表
    reverse(){
        let current = this.head;
        let prev = null;
        while( current ){
            let next = current.next
            current.next = prev
            current.prev = next
            prev = current
            current = next
        }
        this.tail = this.head
        this.head = prev
    }

    // 两节点间交换
    swap( nodeOne, nodeTwo ) {
        let current = this.head;
        let counter = 0;
        let firstNode;
        while( current !== null ) {
            if( counter == nodeOne ){
                firstNode = current;
            } else if( counter == nodeTwo ) {
                let temp = current.data;
                current.data = firstNode.data;
                firstNode.data = temp;
            }
            current = current.next;
            counter++;
        }
        return true
    }

    // 查询是否为空或长度
    length() {
        let current = this.head;
        let counter = 0;
        while( current !== null ) {
            counter++
            current = current.next
        }
        return counter;
    }
    isEmpty() {
        return this.length() < 1
    }

    // 遍历链表
    traverse( fn ) {
        let current = this.head;
        while( current !== null ) {
            fn(current)
            current = current.next;
        }
        return true;
    }

    // 查找节点的索引
    search( item ) {
        let current = this.head;
        let counter = 0;
        while( current ) {
            if( current.data == item ) {
                return counter
            }
            current = current.next
            counter++
        }
        return false;
    }
}

const doublyLinkedList = new DoublyLinkedList();
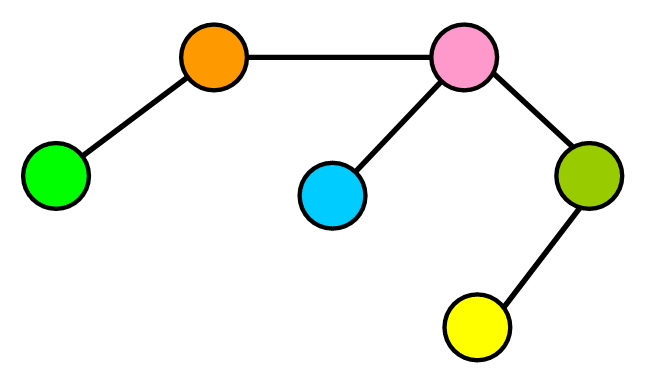
树:Tree
计算机中经常用到的一种非线性的数据结构——树(Tree),由于其存储的所有元素之间具有明显的层次特性,因此常被用来存储具有层级关系的数据,比如文件系统中的文件;也会被用来存储有序列表等。
- 在树结构中,每一个结点只有一个父结点,若一个结点无父节点,则称为树的根结点,简称树的根(root)。
- 每一个结点可以有多个子结点。
- 没有子结点的结点称为叶子结点。
- 一个结点所拥有的子结点的个数称为该结点的度。
- 所有结点中最大的度称为树的度。树的最大层次称为树的深度。
树的分类
常见的树分类如下,其中我们掌握二叉搜索树即可。
- 二叉树:Binary Search Tree
- AVL树:AVL Tree
- 红黑树:Red-Black Tree
- 线段树: Segment Tree - with min/max/sum range queries examples
- 芬威克树:Fenwick Tree (Binary Indexed Tree)
树的应用
- DOM树。每个网页都有一个树数据结构。
- Vue和React的Virtual DOM也是树。
二叉树:Binary Search Tree
- 二叉树是一种特殊的树,它的子节点个数不超过两个。
- 且分别称为该结点的左子树(left subtree)与右子树(right subtree)。
- 二叉树常被用作二叉查找树和二叉搜索树、或是二叉排序树(BST)。
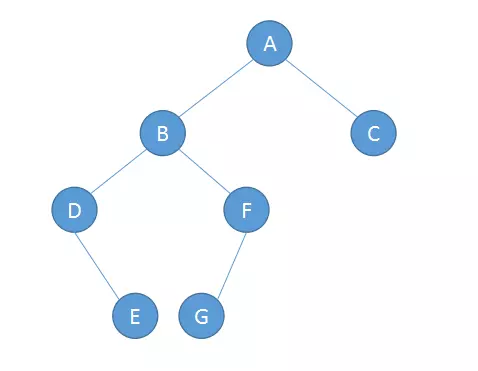
二叉树的遍历
按一定的规则和顺序走遍二叉树的所有结点,使每一个结点都被访问一次,而且只被访问一次,这个操作被称为树的遍历,是对树的一种最基本的运算。
由于二叉树是非线性结构,因此,树的遍历实质上是将二叉树的各个结点转换成为一个线性序列来表示。
按照根节点访问的顺序不同,二叉树的遍历分为以下三种:前序遍历,中序遍历,后序遍历;
前序遍历:Pre-Order
根节点->左子树->右子树
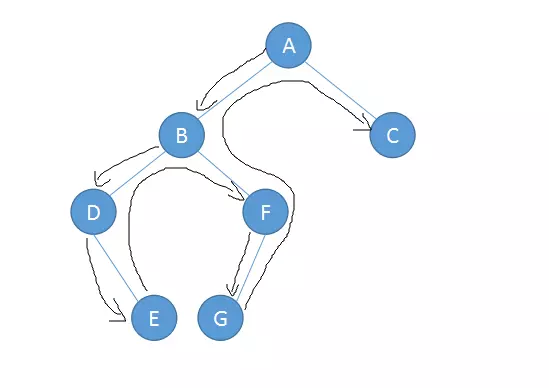
中序遍历:In-Order
左子树->根节点->右子树
后序遍历:Post-Order
左子树->右子树->根节点
二叉树的实现
class Node {
    constructor(data) {
        this.left = null
        this.right = null
        this.value = data
    }
}

class BST {
    constructor() {
        this.root = null
    }
    // 二叉树的各种操作
    // 插入新子节点/节点
    insertNode(root, newNode) {
        if (newNode.value < root.value) {
                // 先执行无左节点操作
                (!root.left)
                    ? root.left = newNode
                    : this.insertNode(root.left, newNode)
            } else {
                (!root.right)
                    ? root.right = newNode
                    : this.insertNode(root.right, newNode)
        }
    }
    insert(value) {
        let newNode = new Node(value)
        // 如果没有根节点
        if (!this.root) {
            this.root = newNode
        } else {
            this.insertNode(this.root, newNode)
        }
    }

    // 移除子节点/节点
    removeNode(root, value) {
        if (!root) {
            return null
        }

        // 从该值小于根节点开始判断
        if (value < root.value) {
            root.left = this.removeNode(root.left, value)
            return root
        } else if (value > root.value) {
            root.right = tis.removeNode(root.right, value)
            return root
        } else {
            // 如果没有左右节点
            if (!root.left && !root.right) {
                root = null
                return root
            }

            // 存在左节点
            if (root.left) {
                root = root.left
                return root
            // 存在右节点
            } else if (root.right) {
                root = root.right
                return root
            }

            // 获取正确子节点的最小值以确保我们有有效的替换
            let minRight = this.findMinNode(root.right)
            root.value = minRight.value
            // 确保删除已替换的节点
            root.right = this.removeNode(root.right, minRight.value)
            return root
        }
    }
    remove(value) {
        if (!this.root) {
            return 'Tree is empty!'
        } else {
            this.removeNode(this.root, value)
        }
    }

    // 获取子节点的最小值
    findMinNode(root) {
        if (!root.left) {
            return root
        } else {
            return this.findMinNode(root.left)
        }
    }

    // 查找子节点/节点
    searchNode(root, value) {
        if (!root) {
            return null
        }

        if (value < root.value) {
            return this.searchNode(root.left, value)
        } else if (value > root.value) {
            return this.searchNode(root.right, value)
        }

        return root
    }
    search(value) {
        if (!this.root) {
            return 'Tree is empty'
        } else {
            return Boolean(this.searchNode(this.root, value))
        }
    }

    // Pre-Order:前序遍历
    preOrder(root) {
        if (!root) {
            return 'Tree is empty'
        } else {
            console.log(root.value)
            this.preOrder(root.left)
            this.preOrder(root.right)
        }
    }

    // In-Order:中序遍历
    inOrder(root) {
        if (!root) {
            return 'Tree is empty'
        } else {
            this.inOrder(root.left)
            console.log(root.value)
            this.inOrder(root.right)
        }
    }

    // Post-Order:后序遍历
    postOrder(root) {
        if (!root) {
            return 'Tree is empty'
        } else {
            this.postOrder(root.left)
            this.postOrder(root.right)
            console.log(root.value)
        }
    }
}
图:Graph
图是由具有边的节点集合组成的数据结构。图可以是定向的或不定向的。
图的应用
- 使用搜索服务,如Google,百度。
- 使用LBS地图服务,如高德,谷歌地图。
- 使用社交媒体网站,如微博,Facebook。
图用于不同的行业和领域:
- GPS系统和谷歌地图使用图表来查找从一个目的地到另一个目的地的最短路径。
- 社交网络使用图表来表示用户之间的连接。
- Google搜索算法使用图 来确定搜索结果的相关性。
- 运营研究是一个使用图 来寻找降低运输和交付货物和服务成本的最佳途径的领域。
- 甚至化学使用图 来表示分子!
图的构成
图表用于表示,查找,分析和优化元素(房屋,机场,位置,用户,文章等)之间的连接。
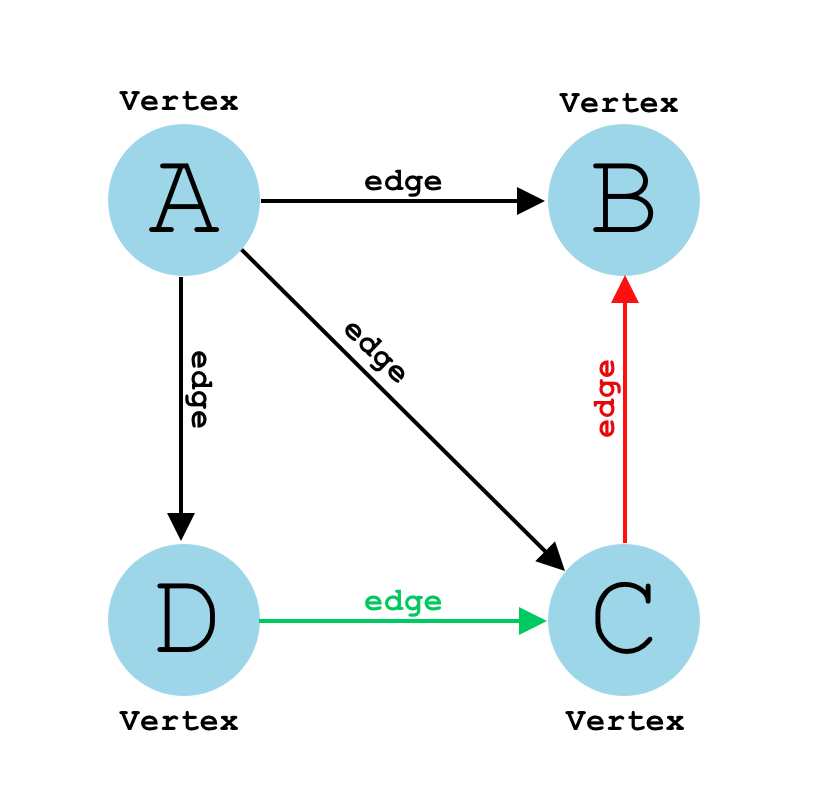
图的基本元素
- 节点:Node,比如地铁站中某个站/多个村庄中的某个村庄/互联网中的某台主机/人际关系中的人.
- 边:Edge,比如地铁站中两个站点之间的直接连线, 就是一个边。
符号和术语
-
V =图中顶点(节点)的总数。 -
E =图中的连接总数(边)。
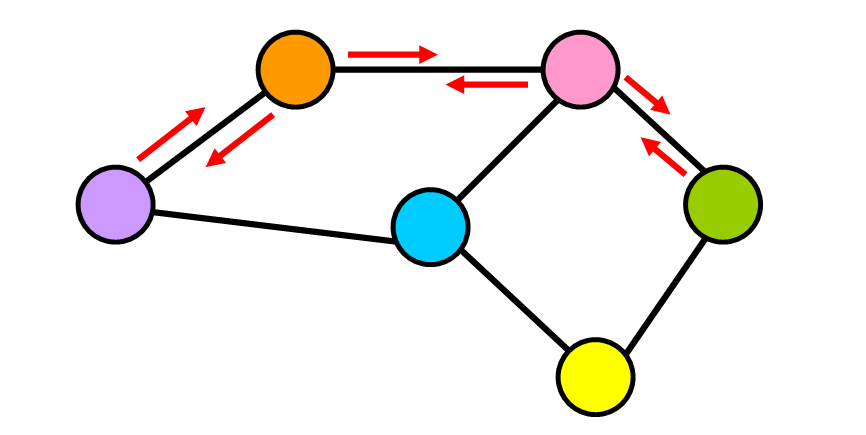
有向图与无向图
有向图中,边具有方向。它们从一个节点转到另一个节点,并且无法通过该边返回到初始节点。
无向图中,边是无向的(它们没有特定的方向)。将无向边视为双向街道。您可以从一个节点转到另一个节点并返回相同的“路径”。
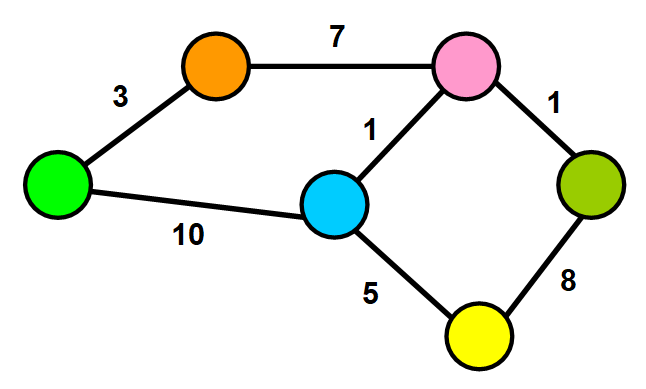
加权图
在加权图中,每条边都有一个与之相关的值(称为权重)。该值用于表示它们连接的节点之间的某种可量化关系。
例如:
- 权重可以表示距离,时间,社交网络中两个用户之间共享的连接数。
- 或者可以用于描述您正在使用的上下文中的节点之间的连接的任何内容。
稀疏图与密集图
当图中的边数接近最大边数时,图是密集的。
当图中的边数明显少于最大边数时,图是稀疏的。
循环
如果你按照图中的一系列连接,可能会找到一条路径,将你带回到同一节点。这就像“走在圈子里”,你走的路可以带你回到你的初始位置。
图的实现
我们将实现具有邻接列表的有向图。
class Graph {
    constructor() {
        this.AdjList = new Map();
    }

    // 基础操作方法
    // 添加顶点
    addVertex(vertex) {
        if (!this.AdjList.has(vertex)) {
            this.AdjList.set(vertex, []);
        } else {
            throw 'Already Exist!!!';
        }
    }

    // 添加边(Edge)
    addEdge(vertex, node) {
        // 向顶点添加边之前,必须验证该顶点是否存在。
        if (this.AdjList.has(vertex)) {
            // 确保添加的边尚不存在。
            if (this.AdjList.has(node)){
                let arr = this.AdjList.get(vertex);
                // 如果都通过,那么可以将边添加到顶点。
                if(!arr.includes(node)){
                    arr.push(node);
                }
            }else {
                throw `Can't add non-existing vertex ->'${node}'`;
            }
        } else {
            throw `You should add '${vertex}' first`;
        }
    }

    // 打印图(Graph)
    print() {
        for (let [key, value] of this.AdjList) {
            console.log(key, value);
        }
    }

}

// 测试
let g = new Graph();
let arr = ['A', 'B', 'C', 'D', 'E', 'F'];
for (let i = 0; i < arr.length; i++) {
    g.addVertex(arr[i]);
}
g.addEdge('A', 'B');
g.addEdge('A', 'D');
g.addEdge('A', 'E');
g.addEdge('B', 'C');
g.addEdge('D', 'E');
g.addEdge('E', 'F');
g.addEdge('E', 'C');
g.addEdge('C', 'F');
g.print();
/* PRINTED */
// A [ 'B', 'D', 'E' ]
// B [ 'C' ]
// C [ 'F' ]
// D [ 'E' ]
// E [ 'F', 'C' ]
// F []
如果只创建顶点
let graph = new Graph();
graph.addVertex('A');
graph.addVertex('B');
graph.addVertex('C');
graph.addVertex('D');

// 结果
/* Map {
  'A' => [],
  'B' => [],
  'C' => [],
  'D' => []
} */
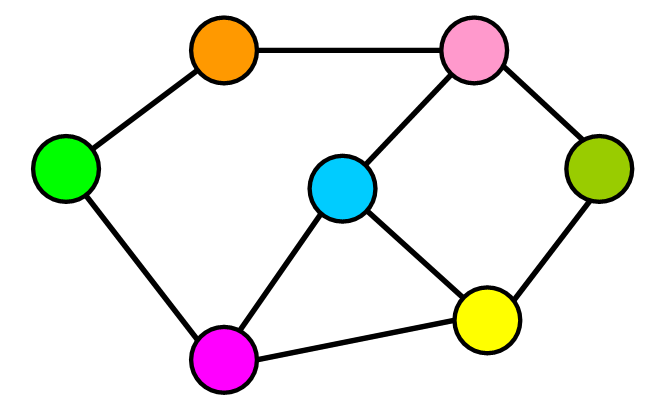
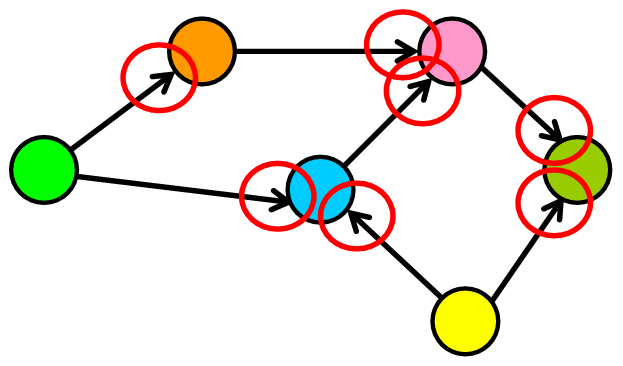
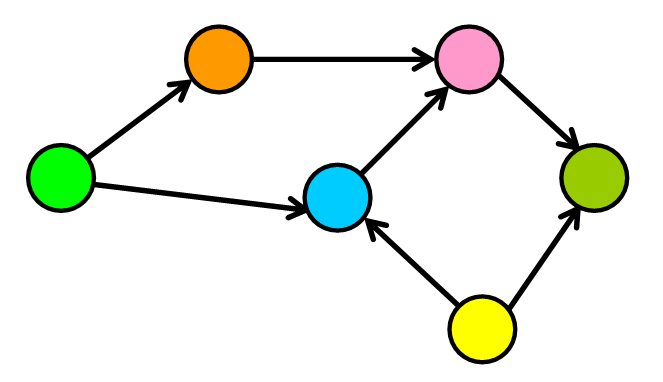
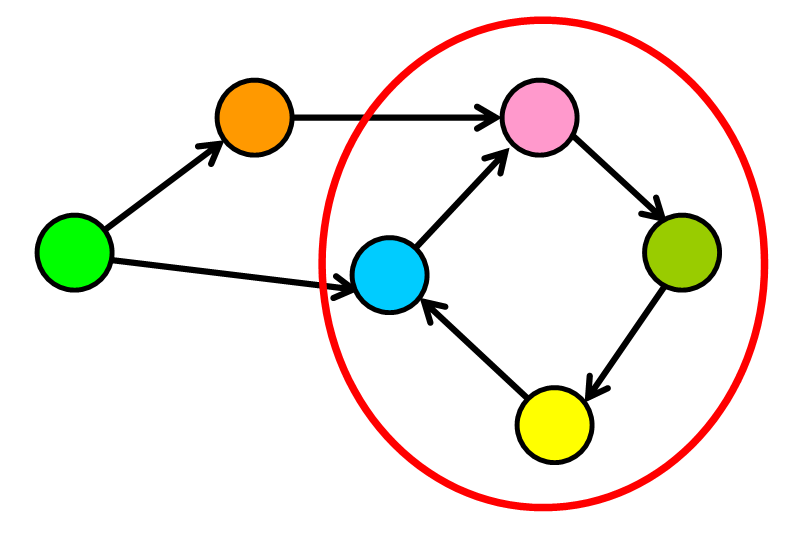
上面创建顶点的结果之所以都为空数组’[]’,是因为数组中需要储存边(Edge)的关系。 例如下图:
该图的Map将为:
Map {
  'A' => ['B', 'C', 'D'],
  // B没有任何指向
  'B' => [],
  'C' => ['B'],
  'D' => ['C']
}
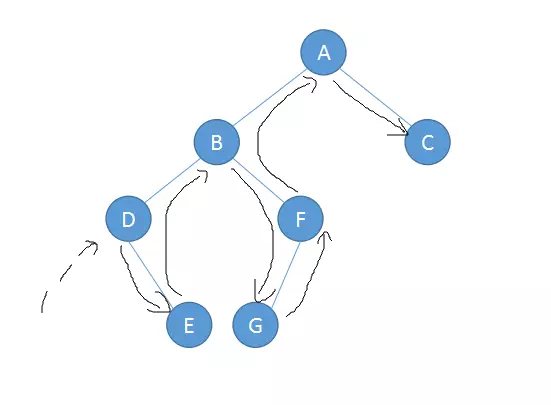
广度优先算法(BFS)实现
一种利用队列实现的搜索算法。简单来说,其搜索过程和 “湖面丢进一块石头激起层层涟漪” 类似。从起点出发,对于每次出队列的点,都要遍历其四周的点。
该算法的具体步骤为:
- BFS将起始节点作为参数。(例如’A’)
- 初始化一个空对象:visited。
- 初始化一个空数组:q,该数组将用作队列。
- 将起始节点标记为已访问。(visited = {‘A’: true})
- 将起始节点放入队列中。(q = [‘A’])
- 循环直到队列为空
循环内部:
- 从中获取元素q并将其存储在变量中。(let current = q.pop())
- 打印 当前 current
- 从图中获取current的边。(let arr = this.AdjList.get(current))。
- 如果未访问元素,则将每个元素标记为已访问并将其放入队列中。
visited = {
    'A': true,
    'B': true,
    'D': true,
    'E': true
}
q = ['B', 'D', 'E']
具体实现:
createVisitedObject(){
  let arr = {};
  for(let key of this.AdjList.keys()){
    arr[key] = false;
  }
  return arr;
}

bfs(startingNode){
  let visited = this.createVisitedObject();
  let q = [];

  visited[startingNode] = true;
  q.push(startingNode);

  while(q.length){
    let current = q.pop()
    console.log(current);

    let arr = this.AdjList.get(current);

    for(let elem of arr){
      if(!visited[elem]){
        visited[elem] = true;
        q.unshift(elem)
      }
    }

  }
}
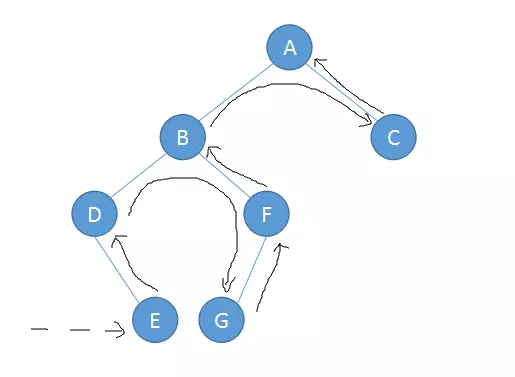
深度优先算法(DFS)实现
一种利用递归实现的搜索算法。简单来说,其搜索过程和 “不撞南墙不回头” 类似。从起点出发,先把一个方向的点都遍历完才会改变方向。
具体步骤:
- 接受起点作为参数dfs(startingNode) 。
- 创建访问对象let visited = this.createVisitedObject()。
- 调用辅助函数递归起始节点和访问对象this.dfsHelper(startingNode, visited)。
- dfsHelper 将其标记为已访问并打印出来。
createVisitedObject(){
    let arr = {};
    for(let key of this.AdjList.keys()){
        arr[key] = false;
    }
    return arr;
}

dfs(startingNode){
    console.log('\nDFS')
    let visited = this.createVisitedObject();
    this.dfsHelper(startingNode, visited);
}

dfsHelper(startingNode, visited){
    visited[startingNode] = true;
    console.log(startingNode);

    let arr = this.AdjList.get(startingNode);

    for(let elem of arr){
        if(!visited[elem]){
            this.dfsHelper(elem, visited);
        }
    }
}

doesPathExist(firstNode, secondNode){
    let path = [];
    let visited = this.createVisitedObject();
    let q = [];
    visited[firstNode] = true;
    q.push(firstNode);
    while(q.length){
        let node = q.pop();
        path.push(node);
        let elements = this.AdjList.get(node);
        if(elements.includes(secondNode)){
            console.log(path.join('->'))
            return true;
        }else{
            for(let elem of elements){
                if(!visited[elem]){
                    visited[elem] = true;
                    q.unshift(elem);
                }
            }
        }
    }
    return false;
    // 多了个大括号
    }
}
BFS 的重点在于队列,而 DFS 的重点在于递归。这是它们的本质区别。